Monday, October 4, 2010

Harvest Apple Æbleskiver

This is a seasonal adaptation of the basic æbleskiver recipe that I posted yesterday.  By substituting some of the buttermilk with apple cider, and adding some cinnamon and nutmeg, this makes a heavenly autumnal breakfast.  Since I rarely have buttermilk on hand when I get the whim to make these, I use the substitution described in the previous recipe.  For this particular version, I use a tablespoon of apple cider vinegar combined with milk to get a buttermilk-like result.  I think the best way to enjoy these is with some warm apple butter and a little plain yogurt, but they can also be served with butter and maple syrup.


Harvest Apple Æbleskiver

1 tablespoon apple cider vinegar, plus enough milk to make up 1 cup of liquid
6 egg whites
6 egg yolks
1 cup apple cider
2 cups flour (I use whole wheat)
2 tablespoons honey
2 teaspoons cinnamon
1/4 teaspoon nutmeg
1 teaspoon baking soda
1/2 teaspoon salt
Oil or cooking spray
Powdered sugar (optional)

  1. Combine vinegar and milk and let stand at least ten minutes.
  2. Beat egg whites until stiff peaks form.  Set aside.
  3. Beat yolks until lemon-colored.  Mix in milk, cider, flour, honey, spices, baking soda, and salt.  Gently fold in beated whites.  
  4. Heat æbleskiver pan over medium heat.  Place small amount of oil or cooking spray in each cup of pan. Fill each cup about 2/3 full with batter.  Cook until batter bubbles up a bit and is set around edges.  Turn puffs with a toothpick or wooden skewer and cook until completely set.  (This will vary depending on your pan-- one of my pans takes a few minutes longer than the other, so you'll have to experiment with what works best for you.)  Roll finished æbleskiver in powdered sugar, if desired.
Yield: 75-80 puffs

Sunday, October 3, 2010

Danish Æbleskiver

After posting my Grandma Taylor's bread recipe, I started thinking about my other paternal great-grandmother, Grandma Adeline.  
Really, it's only natural.  
You see, the two of them were the best of childhood friends and remained close throughout the years.  I'm sure they were tickled pink when my grandparents began courting and eventually married.  Adeline's family came to the United States from Denmark.  Ever since I was a little girl, my family would make æbleskiver for breakfast on special occasions to honor this heritage.  Now that I have a family of my own, I happily continue on the tradition-- which has become a special treat for my kids.

Æbleskiver are basically pancakes, except that they are spherical and puffy-- kind of like a popover.  You bake them in a specialized cast iron pan, which is fairly easy to find.  Sometimes they are marketed under the very Americanized trademark "Puffy Pancake."  I've seen them regularly at Bed, Bath, and Beyond in addition to stores that specialize in cast iron ware, such as Dutch ovens.  It is also worth the investment to purchase two pans if you are going to be making æbleskiver for more than just a couple of people.  As you can see from the picture, a pan only makes seven puffs at a time.  And believe me, when you have a hungry crowd clamoring for more, seven at a time just doesn't fly.

You can serve æbleskiver just like American pancakes if you wish, with butter and maple syrup.  That's actually how my kids prefer them.  B and I like them with some homemade jam and a little bit of plain yogurt.  If you want to get authentically Scandinavian with this dish, a wonderful treat is lignonberry jam.  You can find it at IKEA and various online shops.

This recipe calls for buttermilk, but if you don't have any handy there is an easy substitution that works pretty well.  Simply add 1 tablespoon vinegar or lemon juice plus regular milk to make up 1 cup and let stand ten minutes.  1 cup of this mixture will equal 1 cup of buttermilk.   


Danish Æbleskiver  

6 egg whites
6 egg yolks
2 cups buttermilk
2 cups flour (I use whole wheat)
2 tablespoons sugar
1 teaspoon baking soda
1/2 teaspoon salt
Oil or cooking spray for pan
Powdered sugar (optional)

  1. Beat egg whites until stiff peaks form.
  2. Beat yolks until lemon-colored.  Mix in milk, flour, sugar, baking soda, and salt.  Fold beated egg whites gently to mixture.
  3. Heat æbleskiver pan over medium heat.  Place small amount of oil or cooking spray in each cup of pan. Fill each cup about 2/3 full with batter.  Cook until batter bubbles up a bit and is set around edges.  Turn puffs with a toothpick or wooden skewer and cook until completely set.  (This will vary depending on your pan-- one of my pans takes a few minutes longer than the other, so you'll have to experiment with what works best for you.)  Roll finished æbleskiver in powdered sugar, if desired.
Yield: 75-80 puffs


Adapted from a recipe handed down from my Aunt Karen. 

Saturday, October 2, 2010

The Marv 'n' Joe


After posting my grandma's homemade bread recipe, it was only natural that I follow that post with my favorite way to enjoy it. 

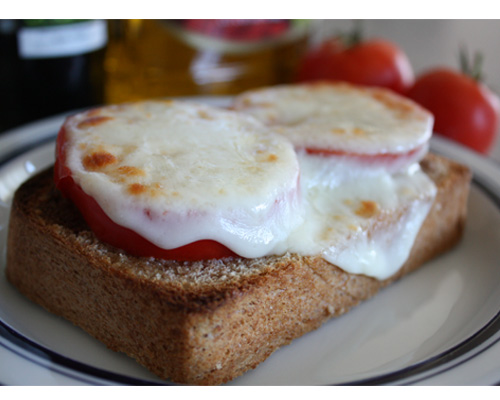
Back during our university days at Utah State, Bryson and I would often meet at Hazel's Bakery in the Taggart Center to grab a Marv n' Joe.  These melt-in-your-mouth open-faced sandwiches are the stuff of legend, and after we left Logan we started to go through withdrawal without our beloved snack.  So naturally, we set out to recreate them in our home kitchen.  During peak tomato season we enjoy these with great gusto and fanfare.


The Marv 'n' Joe
  • thick slice of whole wheat bread 
  • sliced tomatoes
  • sliced provolone cheese
  • extra virgin olive oil
  • balsamic vinegar
  • garlic powder
  • salt
  • pepper
1.  Preheat broiler.
2.  Brush whole wheat bread with olive oil and balsamic vinegar to taste.  Layer tomatoes on slice, sprinkle with garlic powder, salt, and pepper.  Place sliced provolone on top of sandwich, and place in oven.
3.  Broil on pizza stone or cookie sheet until hot and cheese just starts to bubble and brown.

Friday, October 1, 2010

Grandma Taylor's Whole Wheat Bread


Awhile back, my mom decided to take a look at my great-grandmother's whole wheat bread recipe and modernize it for our benefit.  Growing up, it was a staple in our home and nothing was quite as soothing as the smell of the homemade loaves baking in the oven.  My dad loves this recipe in particular because it uses honey-- rather than sugar or some other sweetener-- to get the yeast happy and bubbling.  It also adds a wonderful flavor to the finished product. 


I typically use this recipe as a jumping off point for whatever I feel like making at the time.  I frequently add oats and ground flaxseed to mine, and you can experiment as well.  Just make your additions with the dry ingredients and as long as your dough has the right texture after kneading-- pliable and elastic, you should be golden.


Enjoy one of our family's heirloom recipes!


Grandma Taylor's Whole Wheat Bread
  • 3 cups very warm water
  • 1/2 cup oil (I use canola or grapeseed)
  • 3/4 cup honey
  • 1 tablespoon salt
  • 2 tablespoons instant yeast
  • 8-10 cups whole wheat flour (It will vary slightly each time)
  • 3/4 cup powdered milk
  • 1/4 cup gluten
1.  Stir oil, honey, salt in warm water in a large mixing bowl to combine.  Add yeast and stir gently.  Let rest for about 10 minutes as the yeast activates.  (I grind my wheat while during this time.)
2.  In a separate large bowl sift 6 cups flour, powdered milk, and gluten.  After yeast has started to activate, stir in flour mixture, a few cups at the time.  (I use my stand mixer's dough hook to combine.)  After flour mixture is combined with wet ingredients, add additional flour in 1/2-cup increments until ideal dough consistency is achieved.  Knead dough for 10-12 minutes.  Scrape sides of bowl and cover with cloth and let rise until double, about 1 hour.  
3.  Punch dough down and separate into 3 portions, kneading each briefly.  Form into loaves and placed in greased bread pans.  Cover with cloth and let rise until double, 45-60 minutes.  Place in preheated oven and bake.  After baking, let rest in pans 5-10 minutes, then remove and allow to cool on racks.

Depending on your type of bread pan (metal, glass, etc.) and oven you may have to experiment with the baking temperature.  I have metal pans and bake my loaves in a 325 degree oven for 30 minutes.